
Lesson Template
Version Control with Git
Wolfman and Dracula have been hired by Universal Missions (a space services spinoff from Euphoric State University) to investigate if it is possible to send their next planetary lander to Mars. They want to be able to work on the plans at the same time, but they have run into problems doing this in the past. If they take turns, each one will spend a lot of time waiting for the other to finish, but if they work on their own copies and email changes back and forth things will be lost, overwritten, or duplicated.
A colleague suggests using version control to manage their work. Version control is better than mailing files back and forth:
Nothing that is committed to version control is ever lost. Since all old versions of files are saved, it's always possible to go back in time to see exactly who wrote what on a particular day, or what version of a program was used to generate a particular set of results.
As we have this record of who made what changes when, we know who to ask if we have questions later on, and, if needed it, revert to a previous version, much like the "undo" feature in an editor.
When several people collaborate in the same project, it's possible to accidentally overlook or overwrite someone's changes: the version control system automatically notifies users whenever there's a conflict between one person's work and another's.
Teams are not the only ones to benefit from version control: lone researchers can benefit immensely. Keeping a record of what was changed, when, and why is extremely useful for all researchers if they ever need to come back to the project later on (e.g., a year later, when memory has faded).
Version control is the lab notebook of the digital world: it's what professionals use to keep track of what they've done and to collaborate with other people. Every large software development project relies on it, and most programmers use it for their small jobs as well. And it isn't just for software: books, papers, small data sets, and anything that changes over time or needs to be shared can and should be stored in a version control system.
Prerequisites
In this lesson we use Git from the Unix Shell. Some previous experience with the shell is expected, but isn't mandatory.
Getting ready
Nothing to do: you're ready to go!
Topics
- Automated Version Control
- Setting Up Git
- Creating a Repository
- Tracking Changes
- Exploring History
- Ignoring Things
- Remotes in GitHub
- Collaborating
- Conflicts
- Open Science
- Licensing
- Hosting
Other Resources
Automated Version Control
Learning Objectives
- Understand the benefits of an automated version control system.
- Understand the basics of how Git works.
We'll start by exploring how version control can be used to keep track of what one person did and when. Even if you aren't collaborating with other people, automated version control is much better than this situation:
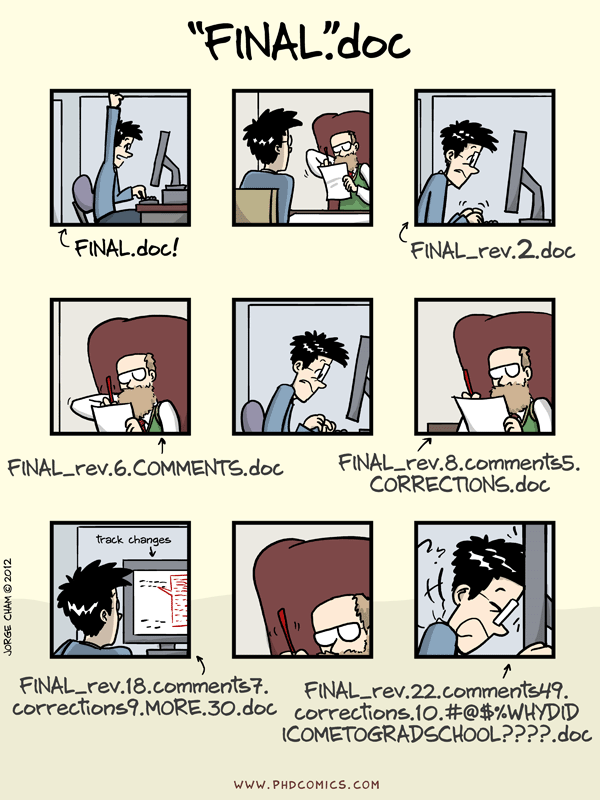
"Piled Higher and Deeper" by Jorge Cham, http://www.phdcomics.com
We've all been in this situation before: it seems ridiculous to have multiple nearly-identical versions of the same document. Some word processors let us deal with this a little better, such as Microsoft Word's "Track Changes" or Google Docs' version history.
Version control systems start with a base version of the document and then save just the changes you made at each step of the way. You can think of it as a tape: if you rewind the tape and start at the base document, then you can play back each change and end up with your latest version.

Changes are saved sequentially
Once you think of changes as separate from the document itself, you can then think about "playing back" different sets of changes onto the base document and getting different versions of the document. For example, two users can make independent sets of changes based on the same document.

Different versions can be saved
If there aren't conflicts, you can even try to play two sets of changes onto the same base document.

Multiple versions can be merged
A version control system is a tool that keeps track of these changes for us and helps us version and merge our files. It allows you to decide which changes make up the next version, called a commit, and keeps useful metadata about them. The complete history of commits for a particular project and their metadata make up a repository. Repositories can be kept in sync across different computers facilitating collaboration among different people.
Setting Up Git
Learning Objectives
- Configure
gitthe first time is used on a computer. - Understand the meaning of the
--globalconfiguration flag.
When we use Git on a new computer for the first time, we need to configure a few things. Here's how Dracula sets up his new laptop:
$ git config --global user.name "Vlad Dracula"
$ git config --global user.email "vlad@tran.sylvan.ia"
$ git config --global color.ui "auto"
(Please use your own name and email address instead of Dracula's.)
He also has to set his favorite text editor, following this table:
| Editor | Configuration command |
|---|---|
| nano | $ git config --global core.editor "nano -w" |
| Text Wrangler | $ git config --global core.editor "edit -w" |
| Sublime Text (Mac) | $ git config --global core.editor "subl -n -w" |
| Sublime Text (Win) | $ git config --global core.editor "'c:/program files/sublime text 2/sublime_text.exe' -w" |
| Notepad++ (Win) | $ git config --global core.editor "'c:/program files (x86)/Notepad++/notepad++.exe' -multiInst -notabbar -nosession -noPlugin" |
| Kate (Linux) | $ git config --global core.editor "kate" |
| Gedit (Linux) | $ git config --global core.editor "gedit -s" |
Git commands are written git verb, where verb is what we actually want it to do. In this case, we're telling Git:
- our name and email address,
- to colorize output,
- what our favorite text editor is, and
- that we want to use these settings globally (i.e., for every project),
The four commands above only need to be run once: the flag --global tells Git to use the settings for every project, in your user account, on this computer.
You can check your settings at any time:
$ git config --listYou can change your configuration as many times as you want: just use the same commands to choose another editor or update your email address.
Creating a Repository
Learning Objectives
- Create a local Git repository.
Once Git is configured, we can start using it. Let's create a directory for our work and then move into that directory:
$ mkdir planets
$ cd planets
Then we tell Git to make planets a repository—a place where Git can store versions of our files:
$ git initIf we use ls to show the directory's contents, it appears that nothing has changed:
$ lsBut if we add the -a flag to show everything, we can see that Git has created a hidden directory within planets called .git:
$ ls -a. .. .gitGit stores information about the project in this special sub-directory. If we ever delete it, we will lose the project's history.
We can check that everything is set up correctly by asking Git to tell us the status of our project:
$ git status# On branch master
#
# Initial commit
#
nothing to commit (create/copy files and use "git add" to track)Places to Create Git Repositories
Dracula starts a new project, moons, related to his planets project. Despite Wolfman's concerns, he enters the following sequence of commands to create one Git repository inside another:
cd             # return to home directory
mkdir planets  # make a new directory planets
cd planets     # go into planets
git init       # make the planets directory a Git repository
mkdir moons    # make a sub-directory planets/moons
cd moons       # go into planets/moons
git init       # make the moons sub-directory a Git repository
Why is it a bad idea to do this? How can Dracula "undo" his last git init?
Tracking Changes
Learning Objectives
- Go through the modify-add-commit cycle for single and multiple files.
- Explain where information is stored at each stage of Git commit workflow.
Let's create a file called mars.txt that contains some notes about the Red Planet's suitability as a base. (We'll use nano to edit the file; you can use whatever editor you like. In particular, this does not have to be the core.editor you set globally earlier.)
$ nano mars.txtType the text below into the mars.txt file:
Cold and dry, but everything is my favorite colormars.txt now contains a single line, which we can see by running:
$ lsmars.txt$ cat mars.txtCold and dry, but everything is my favorite colorIf we check the status of our project again, Git tells us that it's noticed the new file:
$ git status# On branch master
#
# Initial commit
#
# Untracked files:
# (use "git add <file>..." to include in what will be committed)
#
# mars.txt
nothing added to commit but untracked files present (use "git add" to track)The "untracked files" message means that there's a file in the directory that Git isn't keeping track of. We can tell Git to track a file using git add:
$ git add mars.txtand then check that the right thing happened:
$ git status# On branch master
#
# Initial commit
#
# Changes to be committed:
# (use "git rm --cached <file>..." to unstage)
#
# new file: mars.txt
#Git now knows that it's supposed to keep track of mars.txt, but it hasn't recorded these changes as a commit yet. To get it to do that, we need to run one more command:
$ git commit -m "Start notes on Mars as a base"[master (root-commit) f22b25e] Start notes on Mars as a base
1 file changed, 1 insertion(+)
create mode 100644 mars.txtWhen we run git commit, Git takes everything we have told it to save by using git add and stores a copy permanently inside the special .git directory. This permanent copy is called a commit (or revision) and its short identifier is f22b25e (Your commit may have another identifier.)
We use the -m flag (for "message") to record a short, descriptive, and specific comment that will help us remember later on what we did and why. If we just run git commit without the -m option, Git will launch nano (or whatever other editor we configured as core.editor) so that we can write a longer message.
Good commit messages start with a brief (<50 characters) summary of changes made in the commit. If you want to go into more detail, add a blank line between the summary line and your additional notes.
If we run git status now:
$ git status# On branch master
nothing to commit, working directory cleanit tells us everything is up to date. If we want to know what we've done recently, we can ask Git to show us the project's history using git log:
$ git logcommit f22b25e3233b4645dabd0d81e651fe074bd8e73b
Author: Vlad Dracula <vlad@tran.sylvan.ia>
Date: Thu Aug 22 09:51:46 2013 -0400
Start notes on Mars as a basegit log lists all commits made to a repository in reverse chronological order. The listing for each commit includes the commit's full identifier (which starts with the same characters as the short identifier printed by the git commit command earlier), the commit's author, when it was created, and the log message Git was given when the commit was created.
Now suppose Dracula adds more information to the file. (Again, we'll edit with nano and then cat the file to show its contents; you may use a different editor, and don't need to cat.)
$ nano mars.txt
$ cat mars.txtCold and dry, but everything is my favorite color
The two moons may be a problem for WolfmanWhen we run git status now, it tells us that a file it already knows about has been modified:
$ git status# On branch master
# Changes not staged for commit:
# (use "git add <file>..." to update what will be committed)
# (use "git checkout -- <file>..." to discard changes in working directory)
#
# modified: mars.txt
#
no changes added to commit (use "git add" and/or "git commit -a")The last line is the key phrase: "no changes added to commit". We have changed this file, but we haven't told Git we will want to save those changes (which we do with git add) nor have we saved them (which we do with git commit). So let's do that now. It is good practice to always review our changes before saving them. We do this using git diff. This shows us the differences between the current state of the file and the most recently saved version:
$ git diffdiff --git a/mars.txt b/mars.txt
index df0654a..315bf3a 100644
--- a/mars.txt
+++ b/mars.txt
@@ -1 +1,2 @@
Cold and dry, but everything is my favorite color
+The two moons may be a problem for WolfmanThe output is cryptic because it is actually a series of commands for tools like editors and patch telling them how to reconstruct one file given the other. If we break it down into pieces:
- The first line tells us that Git is producing output similar to the Unix
diffcommand comparing the old and new versions of the file. - The second line tells exactly which versions of the file Git is comparing;
df0654aand315bf3aare unique computer-generated labels for those versions. - The third and fourth lines once again show the name of the file being changed.
- The remaining lines are the most interesting, they show us the actual differences and the lines on which they occur. In particular, the
+markers in the first column show where we have added lines.
After reviewing our change, it's time to commit it:
$ git commit -m "Add concerns about effects of Mars' moons on Wolfman"
$ git status# On branch master
# Changes not staged for commit:
# (use "git add <file>..." to update what will be committed)
# (use "git checkout -- <file>..." to discard changes in working directory)
#
# modified: mars.txt
#
no changes added to commit (use "git add" and/or "git commit -a")Whoops: Git won't commit because we didn't use git add first. Let's fix that:
$ git add mars.txt
$ git commit -m "Add concerns about effects of Mars' moons on Wolfman"[master 34961b1] Add concerns about effects of Mars' moons on Wolfman
1 file changed, 1 insertion(+)Git insists that we add files to the set we want to commit before actually committing anything because we may not want to commit everything at once. For example, suppose we're adding a few citations to our supervisor's work to our thesis. We might want to commit those additions, and the corresponding addition to the bibliography, but not commit the work we're doing on the conclusion (which we haven't finished yet).
To allow for this, Git has a special staging area where it keeps track of things that have been added to the current change set but not yet committed.

The Git Staging Area
Let's watch as our changes to a file move from our editor to the staging area and into long-term storage. First, we'll add another line to the file:
$ nano mars.txt
$ cat mars.txtCold and dry, but everything is my favorite color
The two moons may be a problem for Wolfman
But the Mummy will appreciate the lack of humidity$ git diffdiff --git a/mars.txt b/mars.txt
index 315bf3a..b36abfd 100644
--- a/mars.txt
+++ b/mars.txt
@@ -1,2 +1,3 @@
Cold and dry, but everything is my favorite color
The two moons may be a problem for Wolfman
+But the Mummy will appreciate the lack of humiditySo far, so good: we've added one line to the end of the file (shown with a + in the first column). Now let's put that change in the staging area and see what git diff reports:
$ git add mars.txt
$ git diffThere is no output: as far as Git can tell, there's no difference between what it's been asked to save permanently and what's currently in the directory. However, if we do this:
$ git diff --stageddiff --git a/mars.txt b/mars.txt
index 315bf3a..b36abfd 100644
--- a/mars.txt
+++ b/mars.txt
@@ -1,2 +1,3 @@
Cold and dry, but everything is my favorite color
The two moons may be a problem for Wolfman
+But the Mummy will appreciate the lack of humidityit shows us the difference between the last committed change and what's in the staging area. Let's save our changes:
$ git commit -m "Discuss concerns about Mars' climate for Mummy"[master 005937f] Discuss concerns about Mars' climate for Mummy
1 file changed, 1 insertion(+)check our status:
$ git status# On branch master
nothing to commit, working directory cleanand look at the history of what we've done so far:
$ git logcommit 005937fbe2a98fb83f0ade869025dc2636b4dad5
Author: Vlad Dracula <vlad@tran.sylvan.ia>
Date: Thu Aug 22 10:14:07 2013 -0400
Discuss concerns about Mars' climate for Mummy
commit 34961b159c27df3b475cfe4415d94a6d1fcd064d
Author: Vlad Dracula <vlad@tran.sylvan.ia>
Date: Thu Aug 22 10:07:21 2013 -0400
Add concerns about effects of Mars' moons on Wolfman
commit f22b25e3233b4645dabd0d81e651fe074bd8e73b
Author: Vlad Dracula <vlad@tran.sylvan.ia>
Date:   Thu Aug 22 09:51:46 2013 -0400

Start notes on Mars as a baseTo recap, when we want to add changes to our repository, we first need to add the changed files to the staging area (git add) and then commit the staged changes to the repository (git commit):

The Git Commit Workflow
Committing Changes to Git
Which command(s) below would save the changes of myfile.txt to my local Git repository?
$ git commit -m "my recent changes"
$ git init myfile.txt $ git commit -m "my recent changes"
$ git add myfile.txt $ git commit -m "my recent changes"
$ git commit -m myfile.txt "my recent changes"
bio Repository
Create a new Git repository on your computer called bio. Write a three-line biography for yourself in a file called me.txt, commit your changes, then modify one line, add a fourth line, and display the differences between its updated state and its original state.
Exploring History
Learning Objectives
- Identify and use Git commit numbers.
- Compare various versions of tracked files.
- Restore old versions of files.
If we want to see what we changed at different steps, we can use git diff again, but with the notation HEAD~1, HEAD~2, and so on, to refer to old commits:
$ git diff HEAD~1 mars.txtdiff --git a/mars.txt b/mars.txt
index 315bf3a..b36abfd 100644
--- a/mars.txt
+++ b/mars.txt
@@ -1,2 +1,3 @@
Cold and dry, but everything is my favorite color
The two moons may be a problem for Wolfman
+But the Mummy will appreciate the lack of humidity$ git diff HEAD~2 mars.txtdiff --git a/mars.txt b/mars.txt
index df0654a..b36abfd 100644
--- a/mars.txt
+++ b/mars.txt
@@ -1 +1,3 @@
Cold and dry, but everything is my favorite color
+The two moons may be a problem for Wolfman
+But the Mummy will appreciate the lack of humidityIn this way, we can build up a chain of commits. The most recent end of the chain is referred to as HEAD; we can refer to previous commits using the ~ notation, so HEAD~1 (pronounced "head minus one") means "the previous commit", while HEAD~123 goes back 123 commits from where we are now.
We can also refer to commits using those long strings of digits and letters that git log displays. These are unique IDs for the changes, and "unique" really does mean unique: every change to any set of files on any computer has a unique 40-character identifier. Our first commit was given the ID f22b25e3233b4645dabd0d81e651fe074bd8e73b, so let's try this:
$ git diff f22b25e3233b4645dabd0d81e651fe074bd8e73b mars.txtdiff --git a/mars.txt b/mars.txt
index df0654a..b36abfd 100644
--- a/mars.txt
+++ b/mars.txt
@@ -1 +1,3 @@
Cold and dry, but everything is my favorite color
+The two moons may be a problem for Wolfman
+But the Mummy will appreciate the lack of humidityThat's the right answer, but typing out random 40-character strings is annoying, so Git lets us use just the first few characters:
$ git diff f22b25e mars.txtdiff --git a/mars.txt b/mars.txt
index df0654a..b36abfd 100644
--- a/mars.txt
+++ b/mars.txt
@@ -1 +1,3 @@
Cold and dry, but everything is my favorite color
+The two moons may be a problem for Wolfman
+But the Mummy will appreciate the lack of humidityAll right! So we can save changes to files and see what we've changed—now how can we restore older versions of things? Let's suppose we accidentally overwrite our file:
$ nano mars.txt
$ cat mars.txtWe will need to manufacture our own oxygengit status now tells us that the file has been changed, but those changes haven't been staged:
$ git status# On branch master
# Changes not staged for commit:
# (use "git add <file>..." to update what will be committed)
# (use "git checkout -- <file>..." to discard changes in working directory)
#
# modified: mars.txt
#
no changes added to commit (use "git add" and/or "git commit -a")We can put things back the way they were by using git checkout:
$ git checkout HEAD mars.txt
$ cat mars.txtCold and dry, but everything is my favorite color
The two moons may be a problem for Wolfman
But the Mummy will appreciate the lack of humidityAs you might guess from its name, git checkout checks out (i.e., restores) an old version of a file. In this case, we're telling Git that we want to recover the version of the file recorded in HEAD, which is the last saved commit. If we want to go back even further, we can use a commit identifier instead:
$ git checkout f22b25e mars.txtIt's important to remember that we must use the commit number that identifies the state of the repository before the change we're trying to undo. A common mistake is to use the number of the commit in which we made the change we're trying to get rid of. In the example below, we want to retrieve the state from before the most recent commit (HEAD~1), which is commit f22b25e:

Git Checkout
So, to put it all together:
The fact that files can be reverted one by one tends to change the way people organize their work. If everything is in one large document, it's hard (but not impossible) to undo changes to the introduction without also undoing changes made later to the conclusion. If the introduction and conclusion are stored in separate files, on the other hand, moving backward and forward in time becomes much easier.
Recovering Older Versions of a File
Jennifer has made changes to the Python script that she has been working on for weeks, and the modifications she made this morning "broke" the script and it no longer runs. She has spent ~ 1hr trying to fix it, with no luck...
Luckily, she has been keeping track of her project's versions using Git! Which commands below will let her recover the last committed version of her Python script called data_cruncher.py?
$ git checkout HEAD
$ git checkout HEAD data_cruncher.py
$ git checkout HEAD~1 data_cruncher.py
$ git checkout
data_cruncher.py Both 2 & 4
Ignoring Things
Learning Objectives
- Configure Git to ignore specific files.
- Explain why ignoring files can be useful.
What if we have files that we do not want Git to track for us, like backup files created by our editor or intermediate files created during data analysis. Let's create a few dummy files:
$ mkdir results
$ touch a.dat b.dat c.dat results/a.out results/b.outand see what Git says:
$ git status# On branch master
# Untracked files:
# (use "git add <file>..." to include in what will be committed)
#
# a.dat
# b.dat
# c.dat
# results/
nothing added to commit but untracked files present (use "git add" to track)Putting these files under version control would be a waste of disk space. What's worse, having them all listed could distract us from changes that actually matter, so let's tell Git to ignore them.
We do this by creating a file in the root directory of our project called .gitignore:
$ nano .gitignore
$ cat .gitignore*.dat
results/These patterns tell Git to ignore any file whose name ends in .dat and everything in the results directory. (If any of these files were already being tracked, Git would continue to track them.)
Once we have created this file, the output of git status is much cleaner:
$ git status# On branch master
# Untracked files:
# (use "git add <file>..." to include in what will be committed)
#
# .gitignore
nothing added to commit but untracked files present (use "git add" to track)The only thing Git notices now is the newly-created .gitignore file. You might think we wouldn't want to track it, but everyone we're sharing our repository with will probably want to ignore the same things that we're ignoring. Let's add and commit .gitignore:
$ git add .gitignore
$ git commit -m "Add the ignore file"
$ git status# On branch master
nothing to commit, working directory cleanAs a bonus, using .gitignore helps us avoid accidentally adding to the repository files that we don't want to track:
$ git add a.datThe following paths are ignored by one of your .gitignore files:
a.dat
Use -f if you really want to add them.
fatal: no files addedIf we really want to override our ignore settings, we can use git add -f to force Git to add something. We can also always see the status of ignored files if we want:
$ git status --ignored# On branch master
# Ignored files:
# (use "git add -f <file>..." to include in what will be committed)
#
# a.dat
# b.dat
# c.dat
# results/
nothing to commit, working directory cleanRemotes in GitHub
Learning Objectives
- Explain what remote repositories are and why they are useful.
- Clone a remote repository.
- Push to or pull from a remote repository.
Version control really comes into its own when we begin to collaborate with other people. We already have most of the machinery we need to do this; the only thing missing is to copy changes from one repository to another.
Systems like Git allow us to move work between any two repositories. In practice, though, it's easiest to use one copy as a central hub, and to keep it on the web rather than on someone's laptop. Most programmers use hosting services like GitHub, BitBucket or GitLab to hold those master copies; we'll explore the pros and cons of this in the final section of this lesson.
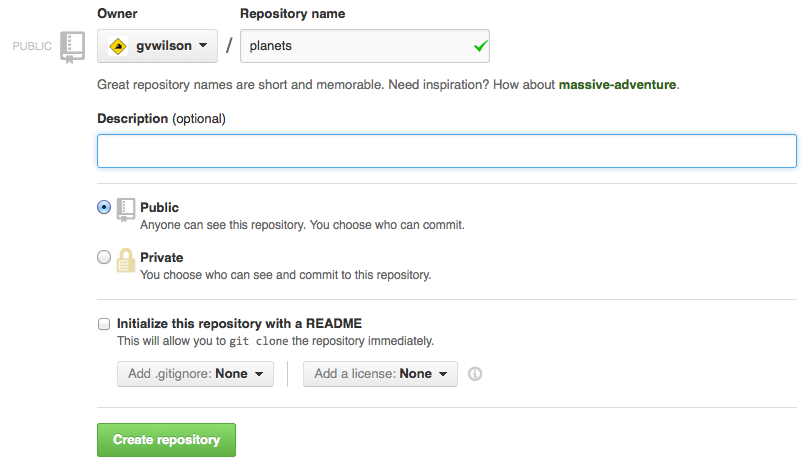
Let's start by sharing the changes we've made to our current project with the world. Log in to GitHub, then click on the icon in the top right corner to create a new repository called planets:

Creating a Repository on GitHub (Step 1)
Name your repository "planets" and then click "Create Repository":
Creating a Repository on GitHub (Step 2)
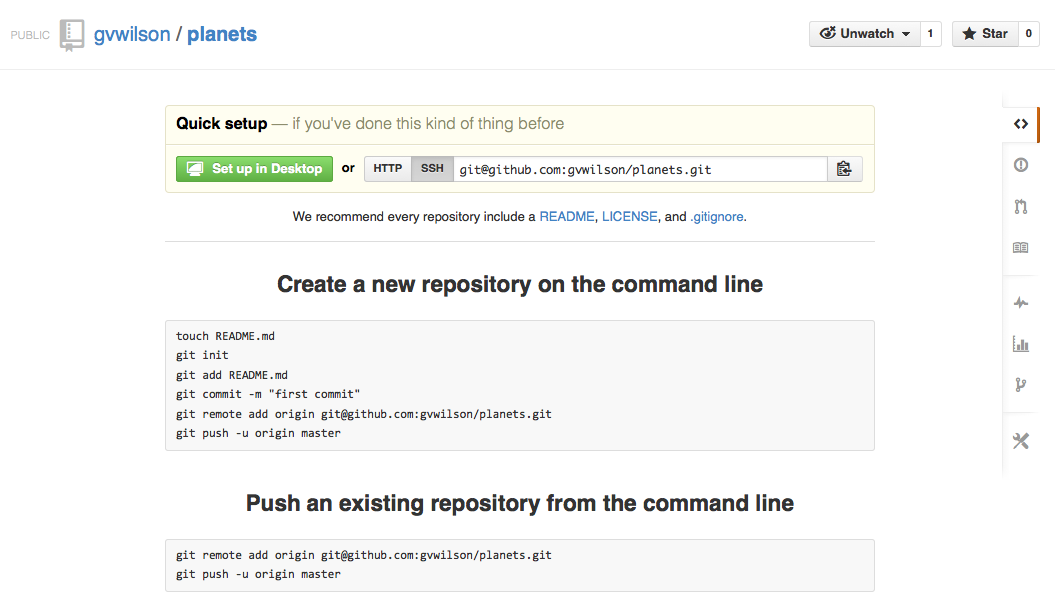
As soon as the repository is created, GitHub displays a page with a URL and some information on how to configure your local repository:
Creating a Repository on GitHub (Step 3)
This effectively does the following on GitHub's servers:
$ mkdir planets
$ cd planets
$ git initOur local repository still contains our earlier work on mars.txt, but the remote repository on GitHub doesn't contain any files yet:

Freshly-Made GitHub Repository
The next step is to connect the two repositories. We do this by making the GitHub repository a remote for the local repository. The home page of the repository on GitHub includes the string we need to identify it:
Where to Find Repository URL on GitHub
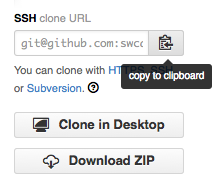
Click on the 'HTTPS' link to change the protocol from SSH to HTTPS.
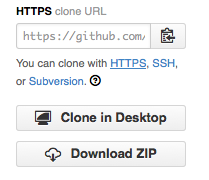
Changing the Repository URL on GitHub
Copy that URL from the browser, go into the local planets repository, and run this command:
$ git remote add origin https://github.com/vlad/planetsMake sure to use the URL for your repository rather than Vlad's: the only difference should be your username instead of vlad.
We can check that the command has worked by running git remote -v:
$ git remote -vorigin https://github.com/vlad/planets.git (push)
origin https://github.com/vlad/planets.git (fetch)The name origin is a local nickname for your remote repository: we could use something else if we wanted to, but origin is by far the most common choice.
Once the nickname origin is set up, this command will push the changes from our local repository to the repository on GitHub:
$ git push origin masterCounting objects: 9, done.
Delta compression using up to 4 threads.
Compressing objects: 100% (6/6), done.
Writing objects: 100% (9/9), 821 bytes, done.
Total 9 (delta 2), reused 0 (delta 0)
To https://github.com/vlad/planets
* [new branch] master -> master
Branch master set up to track remote branch master from origin.Our local and remote repositories are now in this state:

GitHub Repository After First Push
We can pull changes from the remote repository to the local one as well:
$ git pull origin masterFrom https://github.com/vlad/planets
* branch master -> FETCH_HEAD
Already up-to-date.Pulling has no effect in this case because the two repositories are already synchronized. If someone else had pushed some changes to the repository on GitHub, though, this command would download them to our local repository.
GitHub Timestamp
Create a repository on GitHub, clone it, add a file, push those changes to GitHub, and then look at the timestamp of the change on GitHub. How does GitHub record times, and why?
Collaborating
Learning Objectives
- Collaborate pushing to a common repository.
For the next step, get into pairs. Pick one of your repositories on GitHub to use for collaboration.
The partner whose repository is being used needs to give the other person access. On GitHub, click the settings button on the right, then select Collaborators, and enter your partner's username.
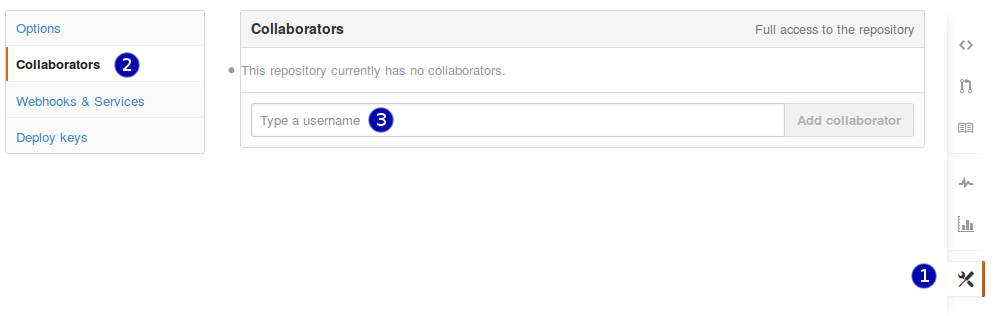
Adding collaborators on GitHub
The other partner should cd to another directory (so ls doesn't show a planets folder), and then make a copy of this repository on your own computer:
$ git clone https://github.com/vlad/planets.gitReplace 'vlad' with your partner's username (the one who owns the repository).
git clone creates a fresh local copy of a remote repository.

After Creating Clone of Repository
The new collaborator can now make a change in their copy of the repository:
$ cd planets
$ nano pluto.txt
$ cat pluto.txtIt is so a planet!$ git add pluto.txt
$ git commit -m "Some notes about Pluto" 1 file changed, 1 insertion(+)
create mode 100644 pluto.txtthen push the change to GitHub:
$ git push origin masterCounting objects: 4, done.
Delta compression using up to 4 threads.
Compressing objects: 100% (2/2), done.
Writing objects: 100% (3/3), 306 bytes, done.
Total 3 (delta 0), reused 0 (delta 0)
To https://github.com/vlad/planets.git
9272da5..29aba7c master -> masterNote that we didn't have to create a remote called origin: Git does this automatically, using that name, when we clone a repository. (This is why origin was a sensible choice earlier when we were setting up remotes by hand.)
We can now download changes into the original repository on our machine:
$ git pull origin masterremote: Counting objects: 4, done.
remote: Compressing objects: 100% (2/2), done.
remote: Total 3 (delta 0), reused 3 (delta 0)
Unpacking objects: 100% (3/3), done.
From https://github.com/vlad/planets
* branch master -> FETCH_HEAD
Updating 9272da5..29aba7c
Fast-forward
pluto.txt | 1 +
1 file changed, 1 insertion(+)
create mode 100644 pluto.txtConflicts
Learning Objectives
- Explain what conflicts are and when they can occur.
- Resolve conflicts resulting from a merge.
As soon as people can work in parallel, it's likely someone's going to step on someone else's toes. This will even happen with a single person: if we are working on a piece of software on both our laptop and a server in the lab, we could make different changes to each copy. Version control helps us manage these conflicts by giving us tools to resolve overlapping changes.
To see how we can resolve conflicts, we must first create one. The file mars.txt currently looks like this in both partners' copies of our planets repository:
$ cat mars.txtCold and dry, but everything is my favorite color
The two moons may be a problem for Wolfman
But the Mummy will appreciate the lack of humidityLet's add a line to one partner's copy only:
$ nano mars.txt
$ cat mars.txtCold and dry, but everything is my favorite color
The two moons may be a problem for Wolfman
But the Mummy will appreciate the lack of humidity
This line added to Wolfman's copyand then push the change to GitHub:
$ git add mars.txt
$ git commit -m "Adding a line in our home copy"[master 5ae9631] Adding a line in our home copy
1 file changed, 1 insertion(+)$ git push origin masterCounting objects: 5, done.
Delta compression using up to 4 threads.
Compressing objects: 100% (3/3), done.
Writing objects: 100% (3/3), 352 bytes, done.
Total 3 (delta 1), reused 0 (delta 0)
To https://github.com/vlad/planets
29aba7c..dabb4c8 master -> masterNow let's have the other partner make a different change to their copy without updating from GitHub:
$ nano mars.txt
$ cat mars.txtCold and dry, but everything is my favorite color
The two moons may be a problem for Wolfman
But the Mummy will appreciate the lack of humidity
We added a different line in the other copyWe can commit the change locally:
$ git add mars.txt
$ git commit -m "Adding a line in my copy"[master 07ebc69] Adding a line in my copy
1 file changed, 1 insertion(+)but Git won't let us push it to GitHub:
$ git push origin masterTo https://github.com/vlad/planets.git
! [rejected] master -> master (non-fast-forward)
error: failed to push some refs to 'https://github.com/vlad/planets.git'
hint: Updates were rejected because the tip of your current branch is behind
hint: its remote counterpart. Merge the remote changes (e.g. 'git pull')
hint: before pushing again.
hint: See the 'Note about fast-forwards' in 'git push --help' for details.
The conflicting changes
Git detects that the changes made in one copy overlap with those made in the other and stops us from trampling on our previous work. What we have to do is pull the changes from GitHub, merge them into the copy we're currently working in, and then push that. Let's start by pulling:
$ git pull origin masterremote: Counting objects: 5, done.
remote: Compressing objects: 100% (2/2), done.
remote: Total 3 (delta 1), reused 3 (delta 1)
Unpacking objects: 100% (3/3), done.
From https://github.com/vlad/planets
* branch master -> FETCH_HEAD
Auto-merging mars.txt
CONFLICT (content): Merge conflict in mars.txt
Automatic merge failed; fix conflicts and then commit the result.git pull tells us there's a conflict, and marks that conflict in the affected file:
$ cat mars.txtCold and dry, but everything is my favorite color
The two moons may be a problem for Wolfman
But the Mummy will appreciate the lack of humidity
<<<<<<< HEAD
We added a different line in the other copy
=======
This line added to Wolfman's copy
>>>>>>> dabb4c8c450e8475aee9b14b4383acc99f42af1dOur change—the one in HEAD—is preceded by <<<<<<<. Git has then inserted ======= as a separator between the conflicting changes and marked the end of the content downloaded from GitHub with >>>>>>>. (The string of letters and digits after that marker identifies the commit we've just downloaded.)
It is now up to us to edit this file to remove these markers and reconcile the changes. We can do anything we want: keep the change made in the local repository, keep the change made in the remote repository, write something new to replace both, or get rid of the change entirely. Let's replace both so that the file looks like this:
$ cat mars.txtCold and dry, but everything is my favorite color
The two moons may be a problem for Wolfman
But the Mummy will appreciate the lack of humidity
We removed the conflict on this lineTo finish merging, we add mars.txt to the changes being made by the merge and then commit:
$ git add mars.txt
$ git status# On branch master
# All conflicts fixed but you are still merging.
# (use "git commit" to conclude merge)
#
# Changes to be committed:
#
# modified: mars.txt
#$ git commit -m "Merging changes from GitHub"[master 2abf2b1] Merging changes from GitHubNow we can push our changes to GitHub:
$ git push origin masterCounting objects: 10, done.
Delta compression using up to 4 threads.
Compressing objects: 100% (6/6), done.
Writing objects: 100% (6/6), 697 bytes, done.
Total 6 (delta 2), reused 0 (delta 0)
To https://github.com/vlad/planets.git
dabb4c8..2abf2b1 master -> masterGit keeps track of what we've merged with what, so we don't have to fix things by hand again when the collaborator who made the first change pulls again:
$ git pull origin masterremote: Counting objects: 10, done.
remote: Compressing objects: 100% (4/4), done.
remote: Total 6 (delta 2), reused 6 (delta 2)
Unpacking objects: 100% (6/6), done.
From https://github.com/vlad/planets
* branch master -> FETCH_HEAD
Updating dabb4c8..2abf2b1
Fast-forward
mars.txt | 2 +-
1 file changed, 1 insertion(+), 1 deletion(-)We get the merged file:
$ cat mars.txt Cold and dry, but everything is my favorite color
The two moons may be a problem for Wolfman
But the Mummy will appreciate the lack of humidity
We removed the conflict on this lineWe don't need to merge again because Git knows someone has already done that.
Version control's ability to merge conflicting changes is another reason users tend to divide their programs and papers into multiple files instead of storing everything in one large file. There's another benefit too: whenever there are repeated conflicts in a particular file, the version control system is essentially trying to tell its users that they ought to clarify who's responsible for what, or find a way to divide the work up differently.
Solving Conflicts that You Create
Clone the repository created by your instructor. Add a new file to it, and modify an existing file (your instructor will tell you which one). When asked by your instructor, pull her changes from the repository to create a conflict, then resolve it.
Conflicts on Non-textual files
What does Git do when there is a conflict in an image or some other non-textual file that is stored in version control?
Open Science
Learning Objectives
- Explain how a version control system can be leveraged as an electronic lab notebook for computational work.
The opposite of "open" isn't "closed". The opposite of "open" is "broken".
--- John Wilbanks
Free sharing of information might be the ideal in science, but the reality is often more complicated. Normal practice today looks something like this:
- A scientist collects some data and stores it on a machine that is occasionally backed up by her department.
- She then writes or modifies a few small programs (which also reside on her machine) to analyze that data.
- Once she has some results, she writes them up and submits her paper. She might include her data—a growing number of journals require this—but she probably doesn't include her code.
- Time passes.
- The journal sends her reviews written anonymously by a handful of other people in her field. She revises her paper to satisfy them, during which time she might also modify the scripts she wrote earlier, and resubmits.
- More time passes.
- The paper is eventually published. It might include a link to an online copy of her data, but the paper itself will be behind a paywall: only people who have personal or institutional access will be able to read it.
For a growing number of scientists, though, the process looks like this:
- The data that the scientist collects is stored in an open access repository like figshare or Zenodo, possibly as soon as it's collected, and given its own DOI. Or the data was already published and is stored in Dryad.
- The scientist creates a new repository on GitHub to hold her work.
- As she does her analysis, she pushes changes to her scripts (and possibly some output files) to that repository. She also uses the repository for her paper; that repository is then the hub for collaboration with her colleagues.
- When she's happy with the state of her paper, she posts a version to arXiv or some other preprint server to invite feedback from peers.
- Based on that feedback, she may post several revisions before finally submitting her paper to a journal.
- The published paper includes links to her preprint and to her code and data repositories, which makes it much easier for other scientists to use her work as starting point for their own research.
This open model accelerates discovery: the more open work is, the more widely it is cited and re-used. However, people who want to work this way need to make some decisions about what exactly "open" means and how to do it.
This is one of the (many) reasons we teach version control. When used diligently, it answers the "how" question by acting as a shareable electronic lab notebook for computational work:
- The conceptual stages of your work are documented, including who did what and when. Every step is stamped with an identifier (the commit ID) that is for most intents and purposes is unique.
- You can tie documentation of rationale, ideas, and other intellectual work directly to the changes that spring from them.
- You can refer to what you used in your research to obtain your computational results in a way that is unique and recoverable.
- With a distributed version control system such as Git, the version control repository is easy to archive for perpetuity, and contains the entire history.
How Reproducible Is My Work?
Ask one of your labmates to reproduce a result you recently obtained using only what they can find in your papers or on the web. Try to do the same for one of their results, then try to do it for a result from a lab you work with.
Licensing
Learning Objectives
- Explain why adding licensing and citation information to a project repository is important.
- Choose a proper license.
- Explain differences in licensing and social expectations.
When a repository with source code, a manuscript or other creative works becomes public, it should include a file LICENSE or LICENSE.txt in the base directory of the repository that clearly states under which license the content is being made available. This is because as creative works, source code is automatically eligible for intellectual property (and thus copyright) protection. Code that appears to be, or is expressly advertised as freely available has not waived such protection. Hence, those who (re)use code that lacks a license statement do so on their own peril, because the author(s) of the software code can always unilaterally make such reuse illegal.
A license solves this problem by granting rights to others (the licensees) that they would otherwise not have. What rights are being granted under which conditions differs, often only slightly, from one license to another. In contrast to proprietary licenses, the open licences certified by the Open Source Initiative all grant at least the following rights, referred to as the Open Source Definition:
- The source code is available, and may be used and redistributed without restrictions, including as part of aggregate distributions.
- Modifications or other derived works are allowed, and can be redistributed as well.
- The question of who receives these rights is not subject to discrimination, including not by fields of endeavor such as commercial versus academic.
How best to choose an appropriate license can seem daunting, given how many possibilities there are. In practice, a few licenses are by far the most popular, including the following:
The GPL is different from most other open source licenses in that it is infective: anyone who distributes a modified version of the code, or anything that includes GPL'ed code, must make their code freely available as well.
The following article provides an excellent overview of licensing and licensing options from the perspective of scientists who also write code:
Morin, A., Urban, J., and Sliz, P. “A Quick Guide to Software Licensing for the Scientist-Programmer” PLoS Computational Biology 8(7) (2012): e1002598.
At the end of the day what matters is that there is a clear statement as to what the license is, and that the license is one already vetted and approved by OSI. Also, the license is best chosen from the get-go, even if for a repository that is not public. Pushing off the decision only makes it more complicated later, because each time a new collaborator starts contributing, they, too, hold copyright and will thus need to be asked for approval once a license is chosen.
If the content of a repository contains reseach products other than software, such as data, and/or creative writing (manuals, technical reports, manuscripts), most licenses designed for software are not suitable.
Data: In most jurisdictions most types of data (with possibly the exception of photos, medical images, etc) are considered facts of nature, and are hence not eligible for copyright protection. Therefore, using a license, which by definition asserts copyright, to signal social or scholarly expectations for attribution serves only to create a legally murky situation. It is much better to clarify the legal side with a public domain waiver such as Creative Commons Zero (CC0), and the social expectations side with express requests for how to use and cite the data. The Dryad data repository in fact requires this.
Creative works: Manuals, reports, manuscripts and other creative works are eligible for intellectual property protection and are hence automatically protected by copyright, just as software source code. Creative Commons has prepared a set of licenses using combinations of four basic restrictions:
- Attribution: derived works must give the original author credit for their work.
- No Derivatives: people may copy the work, but must pass it along unchanged.
- Share Alike: derivative works must license their work under the same terms as the original.
- Noncommercial: free use is allowed, but commercial use is not.
Only the Attribution (CC-BY) and Share-Alike (CC-BY-SA) licenses are considered "Open".
Software Carpentry uses CC-BY for its lessons and the MIT License for its code in order to encourage the widest possible re-use. Again, the most important thing is for the LICENSE file in the root directory of your project to state clearly what your license is. You may also want to include a file called CITATION or CITATION.txt that describes how to reference your project; the one for Software Carpentry states:
To reference Software Carpentry in publications, please cite both of the following:
Greg Wilson: "Software Carpentry: Lessons Learned". arXiv:1307.5448, July 2013.
@online{wilson-software-carpentry-2013,
author = {Greg Wilson},
title = {Software Carpentry: Lessons Learned},
version = {1},
date = {2013-07-20},
eprinttype = {arxiv},
eprint = {1307.5448}
}Can I Use Open License?
Find out whether you are allowed to apply an open license to your software. Can you do this unilaterally, or do you need permission from someone in your institution? If so, who?
Hosting
Learning Objectives
- Explain different options for hosting scientific work.
The second big question for groups that want to open up their work is where to host their code and data. One option is for the lab, the department, or the university to provide a server, manage accounts and backups, and so on. The main benefit of this is that it clarifies who owns what, which is particularly important if any of the material is sensitive (i.e., relates to experiments involving human subjects or may be used in a patent application). The main drawbacks are the cost of providing the service and its longevity: a scientist who has spent ten years collecting data would like to be sure that data will still be available ten years from now, but that's well beyond the lifespan of most of the grants that fund academic infrastructure.
Another option is to purchase a domain and pay an Internet service provider (ISP) to host it. This gives the individual or group more control, and sidesteps problems that can arise when moving from one institution to another, but requires more time and effort to set up than either the option above or the option below.
The third option is to use a public hosting service like GitHub, BitBucket, or SourceForge. Each of these services provides a web interface that enables people to create, view, and edit their code repositories. These services also provide communication and project management tools including issue tracking, wiki pages, email notifications, and code reviews. These services benefit from economies of scale and network effects: it's easier to run one large service well than to run many smaller services to the same standard. It's also easier for people to collaborate. Using a popular service can help connect your project with communities already using the same service.
As an example, Software Carpentry is on GitHub where you can find the source for this page. Anyone with a GitHub account can suggest changes to this text.
Using large, well-established services can also help you quickly take advantage of powerful tools. One such tool, continuous integration (CI), can automatically run software builds and tests whenever code is committed or pull requests are submitted. Direct integration of CI with an online hosting service means this information is present in any pull request, and helps maintain code integrity and quality standards. While CI is still available in self-hosted situations, there is much less setup and maintenance involved with using an online service. Furthermore, such tools are often provided free of charge to open source projects, and are also available for private repositories for a fee.
Can My Work Be Public?
Find out whether you are allowed to host your work openly on a public forge. Can you do this unilaterally, or do you need permission from someone in your institution? If so, who?
Reference
Setting Up Git
- Use
git configto configure a user name, email address, editor, and other preferences once per machine.
Creating a Repository
git initinitializes a repository.
Tracking Changes
git statusshows the status of a repository.- Files can be stored in a project's working directory (which users see), the staging area (where the next commit is being built up) and the local repository (where revisions are permanently recorded).
git addputs files in the staging area.git commitsaves the revisions in the staging area to the local repository.- Always write a log message when committing changes.
Exploring History
git diffdisplays differences between revisions.git checkoutrecovers old versions of files.
Ignoring Things
- The
.gitignorefile tells Git what files to ignore.
Remotes in GitHub
- A local Git repository can be connected to one or more remote repositories.
- Use the HTTPS protocol to connect to remote repositories until you have learned how to set up SSH.
git pushcopies changes from a local repository to a remote repository.git pullcopies changes from a remote repository to a local repository.
Collaborating
git clonecopies a remote repository to create a local repository with a remote calledoriginautomatically set up.
Conflicts
- Conflicts occur when two or more people change the same file(s) at the same time.
- The version control system does not allow people to blindly overwrite each other's changes. Instead, it highlights conflicts so that they can be resolved.
Open Science
- Open scientific work is more useful and more highly cited than closed.
Licensing
- People who incorporate GPL'd software into their own software must make their software also open under the GPL license; most other open licenses do not require this.
- The Creative Commons family of licenses allow people to mix and match requirements and restrictions on attribution, creation of derivative works, further sharing, and commercialization.
- People who are not lawyers should not try to write licenses from scratch.
Hosting
- Projects can be hosted on university servers, on personal domains, or on public forges.
- Rules regarding intellectual property and storage of sensitive information apply no matter where code and data are hosted.
Glossary
- change set
- A group of changes to one or more files that are or will be added to a single commit in a version control repository.
- commit
- To record the current state of a set of files (a change set) in a version control repository. As a noun, the result of commiting, i.e. a recorded change set in a repository. If a commit contains changes to multiple files, all of the changes are recorded together.
- conflict
- A change made by one user of a version control system that is incompatible with changes made by other users. Helping users resolve conflicts is one of version control's major tasks.
- HTTP
- The Hypertext Transfer Protocol used for sharing web pages and other data on the World Wide Web.
- infective license
- A license, such as the GPL, that legally requires people who incorporate material under the infective license into their own work to also release under the same infective license (eg. under the GPL license).
- merge
- (a repository): To reconcile two sets of changes to a repository.
- protocol
- A set of rules that define how one computer communicates with another. Common protocols on the Internet include HTTP and SSH.
- remote
- (of a repository) A version control repository connected to another, in such way that both can be kept in sync exchanging commits.
- repository
- A storage area where a version control system stores the full history of commits of a project and information about who changed what, when.
- resolve
- To eliminate the conflicts between two or more incompatible changes to a file or set of files being managed by a version control system.
- revision
- A recorded change set of a version control repository. The same as a commit.
- SHA-1
- SHA-1 hashes is what Git uses to compute identifiers, including for commits. To compute these, Git uses not only the actual change of a commit, but also its metadata (such as date, author, message), including the identifiers of all commits of preceding changes. This makes Git commit IDs virtually unique. I.e., the likelihood that two commits made independently, even of the same change, receive the same ID is exceedingly small.
- SSH
- The Secure Shell protocol used for secure communication between computers.
- timestamp
- A record of when a particular event occurred.
- version control
- A tool for managing changes to a set of files. Each set of changes creates a new commit of the files; the version control system allows users to recover old commits reliably, and helps manage conflicting changes made by different users.
Discussion
Frequently Asked Questions
People often have questions about Git beyond the scope of the core material. Students who have completed the rest of the lessons might find value in looking through the following topics.
Note that since this material isn't essential for basic Git usage, it won't be covered by the instructor.
More Advanced Git Configuration
In Setting Up Git, we used git config --global to set some default options for Git. It turns out that these configuration options get stored in your home directory in a plain text file called .gitconfig.
$ cat ~/.gitconfig[user]
name = Vlad Dracula
email = vlad@tran.sylvan.ia
[color]
ui = true
[core]
editor = nanoThis file can be opened in your preferred text editor. (Note that it is recommended to continue using the git config command, as this helps avoid introducing syntax errors.)
Eventually, you will want to start customizing Git's behaviour. This can be done by adding more entries to your .gitconfig. The available options are described in the manual:
$ git config --helpIn particular, you might find it useful to add aliases. These are like shortcuts for longer git commands. For example, if you get sick of typing git checkout all the time, you could run the command:
$ git config --global alias.co checkoutNow if we return to the example from Exploring History where we ran:
$ git checkout f22b25e mars.txtwe could now instead type:
$ git co f22b25e mars.txtStyling Git's Log
A good target for customization is output from the log. The default log is quite verbose but gives no graphical hints such as information about which commits were done locally and which were pulled from remotes.
You can use git log --help and git config --help to look for different ways to change the log output. Try the following commands and see what effect they have:
$ git config --global alias.lg "log --graph"
$ git config --global log.abbrevCommit true
$ git config --global format.pretty oneline
$ git lgIf you don't like the effects, you can undo them with:
$ git config --global --unset alias.lg
$ git config --global --unset log.abbrevCommit
$ git config --global --unset format.prettyNon-text Files
Recall when we discussed Conflicts there was a challenge that asked:
What does Git do when there is a conflict in an image or some other non-textual file that is stored in version control?
We will now revisit this in more detail.
Many people want to version control non-text files, such as images, PDFs and Microsoft Office or LibreOffice documents. It is true that Git can handle these filetypes (which fall under the banner of "binary" file types). However, just because it can be done doesn't mean it should be done.
Much of Git's magic comes from being able to do line-by-line comparisons ("diffs") between files. This is generally easy for programming source code and marked up text. For non-text files, a diff can usually only detect that the files have changed but can't say how or where.
This has various impacts on Git's performance and will make it difficult to compare different versions of your project.
For a basic example to show the difference it makes, we're going to go see what would have happened if Dracula had tried using outputs from a word processor instead of plain text.
Create a new directory and go into it:
$ mkdir planets-nontext
$ cd planets-nontextUse a program such as Microsoft Word or LibreOffice Writer to create a new document. Enter the same text that we began with before:
Cold and dry, but everything is my favorite colorSave the document into the planets-nontext directory with the name of mars.doc. Back in the terminal, run the usual commands for setting up a new Git repository:
$ git init
$ git add mars.doc
$ git commit -m "Starting to think about Mars"Then make the same changes to mars.doc that we (or Vlad) previously made to mars.txt.
Cold and dry, but everything is my favorite color
The two moons may be a problem for WolfmanSave and close the word processor. Now see what Git thinks of your changes:
$ git diffdiff --git a/mars.doc b/mars.doc
index 53a66fd..6e988e9 100644
Binary files a/mars.doc and b/mars.doc differCompare this to the earlier git diff obtained when using text files:
diff --git a/mars.txt b/mars.txt
index df0654a..315bf3a 100644
--- a/mars.txt
+++ b/mars.txt
@@ -1 +1,2 @@
 Cold and dry, but everything is my favorite color
+The two moons may be a problem for WolfmanNotice how plain text files give a much more informative diff. You can see exactly which lines changed and what the changes were.
An uninformative git diff is not the only consequence of using Git on binary files. However, most of the other problems boil down to whether or not a good diff is possible.
This isn't to say you should never use Git on binary files. A rule of thumb is that it's okay if the binary file won't change very often, and if it does change, you don't care about merging in small differences between versions.
We've already seen how a word processed report will fail this test. An example that passes the test is a logo for your organization or project. Even though a logo will be stored in a binary format such as jpg or png, you can expect it will remain fairly static through the lifetime of your repository. On the rare occasion that branding does change, you will probably just want to replace the logo completely rather than merge little differences in.
Instructor's Guide
Using a software tool to handle the versions of your project files lets you focus on the more interesting/innovative aspects of your project
- Version control's advantages:
- It's easy to set up
- Every copy of a Git repository is a full backup of a project and its history
- A few easy-to-remember commands are all you need for most day-to-day version control tasks
- The GitHub hosting service provides a web-based collaboration service
- Two main concepts
- commit: a recorded set of changes in your project's file
- repository: the history of all your project's commits
- Why Use Github?
- No need for a server: easy to set up
- GitHub's strong community: your colleagues are probably already there
Overall
Version control might be the most important topic we teach, but Git is definitely the most complicated tool. However, GitHub presently dominates the open software repository landscape, so the time and effort required to teach fundamental Git is justified and worthwhile.
Because of this complexity, we don't teach novice learners about many interesting topics, such as branching, hashes, and commit objects.
Instead we try to convince them that version control is useful for researchers working in teams or not, because it is
- a better way to "undo" changes,
- a better way to collaborate than mailing files back and forth, and
- a better way to share your code and other scientific work with the world.
Teaching Notes
Make sure the network is working before starting this lesson.
Drawings are particularly useful in this lesson: if you have a whiteboard, use it!
Version control is usually not the first subject in a workshop, so get learners to create a GitHub account after the session before.
If some learners are using Windows, there will inevitably be issues merging files with different line endings. (Even if everyone's on some flavor of Unix, different editors may or may not add a newline to the last line of a file.) Take a moment to explain these issues, since learners will almost certainly trip over them again. If learners are running into line ending problems, GitHub has a page that helps with troubleshooting.
We don't use a Git GUI in these notes because we haven't found one that installs easily and runs reliably on the three major operating systems, and because we want learners to understand what commands are being run. That said, instructors should demo a GUI on their desktop at some point during this lesson and point learners at this page.
Instructors should show learners graphical diff/merge tools like DiffMerge.
When appropriate, explain that we teach Git rather than CVS, Subversion, or Mercurial primarily because of GitHub's growing popularity: CVS and Subversion are now seen as legacy systems, and Mercurial isn't nearly as widely used in the sciences right now.
Automated Version Control
Ask, "Who uses 'undo' in their editor?" All say "Me". 'Undo' is the simplest form of version control.
Give learners a five-minute overview of what version control does for them before diving into the watch-and-do practicals. Most of them will have tried to co-author papers by emailing files back and forth, or will have biked into the office only to realize that the USB key with last night's work is still on the kitchen table. Instructors can also make jokes about directories with names like "final version", "final version revised", "final version with reviewer three's corrections", "really final version", and, "come on this really has to be the last version" to motivate version control as a better way to collaborate and as a better way to back work up.
Setting Up Git
We suggest instructors and students use
nanoas the text editor for this lessons because- it runs in all three major operating systems,
- it runs inside the shell (switching windows can be confusing to students), and
- it has shortcut help at the bottom of the window.
Please point out to students during setup that they can and should use another text editor if they're already familiar with it.
When setting up Git, be very clear what learners have to enter: it is common for them to edit the instructor's details (e.g. email). Check at the end using
git config --list.
Creating a Repository
When you do
git status, Mac users may see a.DS_Storefile showing as untracked. This a file that Mac OS creates in each directory.The challenge "Places to create repositories" tries to reinforce the idea that the
.gitfolder contains the whole Git repo and deleting this folder undoes agit init. It also gives the learner the way to fix the common mistake of putting unwanted folders (likeDesktop) under version control.Instead of removing the
.gitfolder directly, you can choose to move it first to a safer directory and remove it from there:$ mv .git temp_git $ rm -rf temp_git
Tracking Changes
It's important that learners do a full commit cycle by themselves (make changes,
git add,git diff, andgit commit). The "biorepository" challenge does that.This is a good moment to show a diff with a graphical diff tool. If you skip it because you're short on time, show it once in GitHub.
Exploring History
One thing may cause confusion is recovering old versions. If, instead of doing
$ git checkout f22b25e mars.txt, someone does$ git checkout f22b25e, they wind up in the "detached HEAD" state and confusion abounds. It's then possible to keep on committing, but things likegit push origin mastera bit later will not give easily comprehensible results. It also makes it look like commits can be lost. To "fix" a "detached HEAD", simplygit checkout master.This is a good moment to show a log within a Git GUI. If you skip it because you're short on time, show it once in GitHub.
Ignoring Things
Just remember that you can use wildcards and regular expressions to ignore a particular set of files in .gitignore.
Remotes in GitHub
Make it clear that Git and GitHub are not the same thing: Git is an open source version control tool, GitHub is a company that hosts Git repositories in the web and provides a web interface to interact with repos the host.
If your learners are advanced enough to be comfortable with SSH, tell them they can use keys to authenticate on GitHub instead of passwords, but don't try to set this up during class: it takes too long, and is a distraction from the core ideas of the lesson.
It is very useful to draw a diagram showing the different repositories involved.
Collaborating
Decide in advance whether all the learners will work in one shared repository, or whether they will work in pairs (or other small groups) in separate repositories. The former is easier to set up; the latter runs more smoothly.
Role playing between two instructors can be effective when teaching the collaboration and conflict sections of the lesson. One instructor can play the role of the repository owner, while the second instructor can play the role of the collaborator. If it is possible, try to use two projectors so that the computer screens of both instructors can be seen. This makes for a very clear illustration to the students as to who does what.
It is also effective to pair up students during this lesson and assign one member of the pair to take the role of the owner and the other the role of the collaborator. In this setup, challenges can include asking the collaborator to make a change, commit it, and push the change to the remote repository so that the owner can then retrieve it, and vice-versa. The role playing between the instructors can get a bit "dramatic" in the conflicts part of the lesson if the instructors want to inject some humor into the room.
If you don't have two projectors, have two instructors at the front of the room. Each instructor does their piece of the collaboration demonstration on their own computer and then passes the projector cord back and forth with the other instructor when it's time for them to do the other part of the collaborative workflow. It takes less than 10 seconds for each switchover, so it doesn't interrupt the flow of the lesson. And of course it helps to give each of the instructors a different-colored hat, or put different-colored sticky notes on their foreheads.
If you're the only instructor, the best way to create is clone the two repos in your Desktop, but under different names, e.g., pretend one is your computer at work:
$ git clone https://github.com/vlad/planets.git planets-at-work- It's very common that learners mistype the remote alias or the remote URL when adding a remote, so they cannot
push. You can diagnose this withgit remote -vand checking carefully for typos.- To fix a wrong alias, you can do
git remote rename <old> <new>. - To fix a wrong URL, you can do
git remote set-url <alias> <newurl>.
- To fix a wrong alias, you can do
Before cloning the repo, be sure that nobody is inside another repo. The best way to achieve this is moving to the
Desktopbefore cloning:cd && cd Desktop.If both repos are in the
Desktop, have them to clone their collaborator repo under a given directory using a second argument:$ git clone https://github.com/vlad/planets.git vlad-planet`The most common mistake is that learners
pushbeforepulling. If theypullafterward, they may get a conflict.Conflicts, sometimes weird, will start to arise. Stay tight: conflicts are next.
Conflicts
Expect the learners to make mistakes. Expect yourself to make mistakes. This happens because it is late in the lesson and everyone is tired.
If you're the only instructor, the best way to create a conflict is:
- Clone your repo in a different directory, pretending is your computer at work:
git clone https://github.com/vlad/planets.git planets-at-work. - At the office, you make a change, commit and push.
- At your laptop repo, you (forget to pull and) make a change, commit and try to push.
git pullnow and show the conflict.
- Clone your repo in a different directory, pretending is your computer at work:
Learners usually forget to
git addthe file after fixing the conflict and just (try to) commit. You can diagnose this withgit status.Remember that you can discard one of the two parents of the merge:
- discard the remote file,
git checkout --ours conflicted_file.txt - discard the local file,
git checkout --theirs conflicted_file.txt
You still have to
git addandgit commitafter this. This is particularly useful when working with binary files.- discard the remote file,
Open Science
Licensing
We teach about licensing because questions about who owns what, or can use what, arise naturally once we start talking about using public services like GitHub to store files. Also, the discussion gives learners a chance to catch their breath after what is often a frustrating couple of hours.
Hosting
A common concern for learners is having their work publicly available on GitHub. While we encourage open science, sometimes private repos are the only choice. It's always interesting to mention the options to have web-hosted private repositories.
Licenses
Instructional Material
All Software Carpentry instructional material is made available under the Creative Commons Attribution license. The following is a human-readable summary of (and not a substitute for) the full legal text of the CC BY 4.0 license.
You are free:
- to Share---copy and redistribute the material in any medium or format
- to Adapt---remix, transform, and build upon the material
for any purpose, even commercially.
The licensor cannot revoke these freedoms as long as you follow the license terms.
Under the following terms:
- Attribution---You must give appropriate credit (mentioning that your work is derived from work that is Copyright © Software Carpentry and, where practical, linking to http://software-carpentry.org/), provide a link to the license, and indicate if changes were made. You may do so in any reasonable manner, but not in any way that suggests the licensor endorses you or your use.
No additional restrictions---You may not apply legal terms or technological measures that legally restrict others from doing anything the license permits. With the understanding that:
Notices:
- You do not have to comply with the license for elements of the material in the public domain or where your use is permitted by an applicable exception or limitation.
- No warranties are given. The license may not give you all of the permissions necessary for your intended use. For example, other rights such as publicity, privacy, or moral rights may limit how you use the material.
Software
Except where otherwise noted, the example programs and other software provided by Software Carpentry are made available under the OSI-approved MIT license.
Permission is hereby granted, free of charge, to any person obtaining a copy of this software and associated documentation files (the "Software"), to deal in the Software without restriction, including without limitation the rights to use, copy, modify, merge, publish, distribute, sublicense, and/or sell copies of the Software, and to permit persons to whom the Software is furnished to do so, subject to the following conditions:
The above copyright notice and this permission notice shall be included in all copies or substantial portions of the Software.
THE SOFTWARE IS PROVIDED "AS IS", WITHOUT WARRANTY OF ANY KIND, EXPRESS OR IMPLIED, INCLUDING BUT NOT LIMITED TO THE WARRANTIES OF MERCHANTABILITY, FITNESS FOR A PARTICULAR PURPOSE AND NONINFRINGEMENT. IN NO EVENT SHALL THE AUTHORS OR COPYRIGHT HOLDERS BE LIABLE FOR ANY CLAIM, DAMAGES OR OTHER LIABILITY, WHETHER IN AN ACTION OF CONTRACT, TORT OR OTHERWISE, ARISING FROM, OUT OF OR IN CONNECTION WITH THE SOFTWARE OR THE USE OR OTHER DEALINGS IN THE SOFTWARE.
Trademark
"Software Carpentry" and the Software Carpentry logo are registered trademarks of NumFOCUS.